Lightroom Journal has the goods on the Lightroom 2.4 changes and improvements. Mostly minor bug fixes and new camera support (including K-7, whooho!).
Tuesday, June 23, 2009
Friday, June 12, 2009
I Finally Start To Understand Flash and Pentax Wireless Flash Options
OK, it took a while, but I'm finally starting to really think I "get" flash, flash options, and the Pentax solutions that are out there. I pointed to this article on ok1000 last year, but thought that after the last 4 hours of hunching over a laptop with PDFs of flash and camera manuals open, a very ghetto "studio" (I started typing in "stupid" just then... ironic) setup with knickknacks as a subject I should write down a few things.
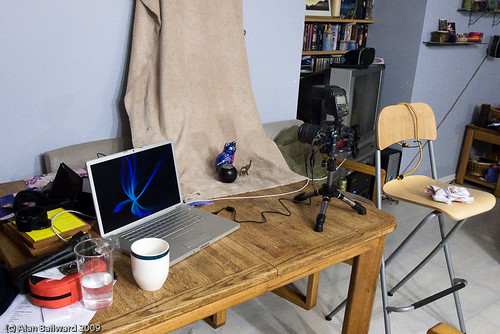
The setup I was using. Click through for notes.
Michael covered things really well in the OK1000 article, but sometimes you just have to do them yourself, by hand, with and without the manual to really get them in your head. Here's what I learned. Oh, first, equipment. The Pentax K20D of course, and the AF360FGZ flash unit, a laptop with USB cord for tethered shooting (more on that in a later post), and a big cup of tea (earl grey, hot) to keep me sane.
- The "SB" mode is really only useful if you want to keep the flash on the camera but not use it for anything other than a focusing aid. Seems useful to me only in situations where you're testing things and don't want to be yanking it on and off the camera a lot, or turning it on and off and on again.
- There are two wireless "slave" modes, 1 and 2. In mode 1 the flash works with Pentax equipment, in mode 2 it works as a triggered slave with non-Pentax gear. So if you're taking your 360 over to a friends house, and he has a Nikon setup and wants to use your flash, remotely triggering it with the flash output from his camera, you need slave mode 2.
- With wireless flash you will always need to fire the remotes with the built in pop-up flash (or another flash on the camera). There's a custom option (29) to set whether or not the output from the pop-up flash is used only for control of the remote flashes (set custom option 29 to off) or if you want it to be used for flash compensation, so both the pop-up and the remote flash contribute to the image (ie: a bit of fill in flash from the pop-up flash) (set custom option 29 to on).
- Some settings are done on the camera (slow sync speed mode) and some are done on the flash unit (first/second curtain). Some are confusing as well because the flash has a mode switch setting for first/second curtain, but under the flash options on the K20D there's also a second curtain mode. I believe the latter doesn't work with an external flash, only the on camera flash.
- Some functions are only available in some exposure modes. For example, high speed sync mode isn't available in the Av exposure mode, only Tv.
- Some functions will only show up in certain circumstances. For example, if you set your flash to the HS (High speed Sync) mode, the little "HS" in the LCD will only show up after you set your aperture past the sync speed of 1/180th.
- In some exposure modes with the Flash attached, one of the wheels suddenly starts controlling the ISO. If you're like me and always forget which the front wheel does and which the rear one does, keep an eye out for this!
- You can get very interesting using +/- EV for both the camera and the flash. IE: To raise the overall image light, set +EV on the camera, but then you can dial down the flash so it doesn't over power your subject. Or something like that. This is more a "when do I use what where" type of thing that I'm still working on.
So why would you use various flash modes and what affects what in them. First the easy ones.
Slow Sync Mode
Used when the backdrop is darker. Allows you to "drag the shutter" to let more light in so the background lights up as well as the "flashed" main subject. This is where you want to adjust first or second curtain settings.
Useful for images of moving objects with a sense of speed or motion to them. IE: a dancer frozen at the peak of a jump, but with blurred leading lines. Also good to play with for dimly lit areas. David Hobby of Strobist fame uses the term "burn in", which evokes a great image of the rest of the background slowly embedding itself onto the sensor, like using a spray paint can without moving it and waiting for what you're pointing it at to become solidly filled in.
High Speed Sync
The opposite of slow sync really. Used if you want faster shutter speeds than the 1/180th or 1/250th that your camera allows. Useful for things like freezing fast action without any leading blur. Also for adjusting how much of a shot is lit. If you want to photograph a person or baby or something and not have the background lit up, only the foreground, then this is where you play.
On the back of the 360 flash it shows a guide line of what distance your flash is being effective at, it'll shrink drastically if you start pusing the shutter speed to 1/1000 or higher.
First / Second Curtain
Classic example is a moving car. First curtain flash will freeze the car but have the blur "trail" moving forward, because the flash fires as soon as the shutter opens. Second curtain fires at the end, so your moving car would be a blur line moving to a frozen image.
Adjusting Your Aperture
This controls the ambient light. A larger f-stop number (ie: f/13) will let less ambient light in, so your background is going to be darker. A smaller f-stop number (ie: f-4.0) lets more background light in, so the background is lighter.
Adjusting Your Shutter Speed
This controls the main subject. Faster or slower shutter will give you different effects in terms of the high/slow speed sync as above.
Getting a Reading
I'm now treading way into "mostly guessing" territory. Lets say you want to light a subject in a not well lit room. My guess would be take a flash-less meter reading, and see what the exposure should be. Lets say 1/4 @ f/5.6. So that's the ambient exposure. Now you're adding a flash on, so you're exposure will be something like 1/180th @ f/5.6. This is where you pick click off this site and read this exercise on Strobist 102, where David makes way more sense than me.
In fact, now I have myself setup with a nicely reproducable system, I'm about ready to start going through the Strobist classes and not be fumbling around wondering why my flash isn't firing!
Thanks for reading this far folks!
Thursday, June 11, 2009
Lightroom Plugins
A few plugins for lightroom crossed my RSS reader today. Lightroom News has a bunch of them, everything from tweeting pics to shutterfly to backing up your config.
Sunday, June 7, 2009
K7 HDR Mode
Some results from tests of the K7's HDR mode are up on the Adorama blog. Their conclusions....
The Pentax K-7 is a game changer. The era of in-camera HDR begins today.
Well, I won't lie and say that while I'm happy with my K20D, I'm itching to get my hands on a K7, just to see....
Friday, June 5, 2009
Flowers!
Took these in a friend's back yard. I went out on a bit of a limb this time and used only my M50/1.7, non-autofocus only manual lens. Course, I still had my other lenses with me, but I wanted to do it by hand. Also in the past I've had some pretty horrible "green button" manual exposure setting with the K20D (I'm told the overexposure problem actually started on the K10D). Course, checking the histogram and LCD helped. I like the bokeh, but I do think I should have bumped it up a couple more stops to get more depth of field.

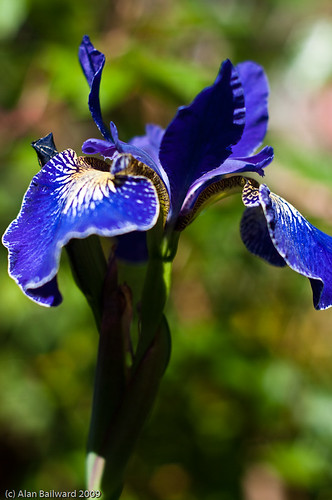
This last one is a sepia version of the red flower above, just some of me playing around with lightroom to get a different look.

Thanks for reading!
Subscribe to:
Posts (Atom)